While the 380 engine was in the shop we thought about other things on the bike we could be working on. One thing that came to mind was what to do with the suspension. The stock 43mm forks that came on the bike were supposedly worked on by Dicks Racing. The only thing that we know for sure at this point is that the forks have stiffer .44kg springs in them. On our maiden voyage before the tear-down the forks actually felt pretty good valving wise but were a little stiff on the springs and wouldn’t settle in corners. Having ridden a 2002 model bike with stock 43mm forks we can say that we think something was probably done to our forks because the stock 2002 forks had a near deadly mid-stroke harshness that our forks didn’t exhibit at all.
One option could be to freshen up the 43mm forks that came with the bike and just install lighter fork springs. Or, another option could be to set the stock forks aside and go with something completely different. Realizing the Project 380 will be used 95% for off-road riding, we starting doing some online research. Two of the best all-around fork options that kept popping up for general off-road use were the stock 98-99 WP 50mm conventional forks and the 96-98 Suzuki RM Showa Twin-Chamber conventional forks.
Yes, these forks are old and on top of that they don’t look as “cool” as the new inverted MX style forks. These facts are true but the reality is the inverted forks were designed to be stiffer and flex less for motocross riding. Since we aren’t planning on doing much motocross riding on the 380 we want a fork that will be compliant and forgiving off-road but still soak up whoops and provide good handling. The WP 50mm and Showa conventional forks both received glowing reviews from the magazines in their day. In fact when the KTM and Suzuki bikes switched to the first generation of inverted forks the reviewers were asking why the change was even made because the new forks were not as good. It is rare to find such comments on stock forks so that was saying something.
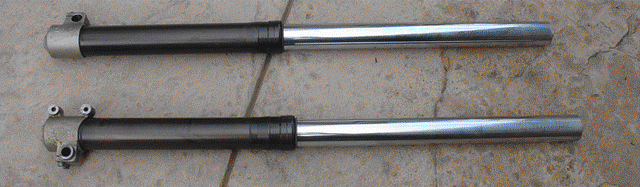
To be clear, we are not saying an inverted fork can’t work off-road - in fact our Project 525 forks by Novation are some of our favorite do-it-all forks. We just wanted to do a little experimenting without spending a ton of money to see how good these older conventional forks can really be off-road. After doing a little searching we were able to pick-up a complete front end from a earlier model 380 with the WP 50mm forks. These forks use different triple-clamps with an offset of 14mm, a smaller axle and a different caliper mounting bracket than our 43mm forks. Having found the entire front end would make life a lot easier. In addition to the complete front end we found another set of WP 50mm forks at a good price that we could use for parts if needed.
The WP 50mm forks are beefy! They are heavier than many of today’s forks and hold almost a quart of oil per leg which should mean less oil-breakdown. After receiving the forks we tore into them with hopes of finding everything in good order. Our plan was to use the lower tubes from the second set of forks as they appeared to be in great shape with few scratches where as the forks from the complete front end had a few more scratches are looked like they had more time on them. Getting the forks apart is really piece of cake, at least if the forks are in good shape.
While trying to remove the forks caps we ran into our first problem on what we thought was the “good” pair of used forks. The fork adjustment screws are supposed to slide through caps and remain on the forks but in our case the screws appeared to have been treated a little unkindly in their day and were a little out of round. Instead of the caps sliding over the adjustment screws the caps would just spin in place. After trying to file the screws round again we weren’t having any success so a little beating was in order. Generally beating on anything mechanical will result in some damage but in this case we already knew these forks were going to be used for parts. We managed to free the caps but did do a little damage to the adjusters. Since we had another pair of these forks with caps and adjusters in good shape we weren’t too concerned.
After the fork caps were out of the way the rest was easy. The springs slide right off after removing the retainer and spacer at the top. We dumped the oil into a container and then removed the dust seal with a small screwdriver. Next we removed the spring clip that holds in the main fork seal, again with a small screw driver. Holding the fork in a vice allowed us to remove the bolt from the bottom of the fork that holds the cartridge rod in place. With the cartridge out of the fork all that was left was to remove the bottoming cone and then get a good grasp on both legs and slide-hammer them apart, much easier than it sounds. Once the legs were separated there are two bushings that come off without any tools. We followed the same steps for the second set of forks and had them apart in no time.
The first set with the damaged adjusters must have been sitting for years. We found the oil was pretty nasty and had turned close to a rusty color inside. In addition when removing the bottoming cone on one side it kept getting stuck. This ended up being due to a ding in the fork leg causing both legs to stick at that point in the travel.
Overall this set of forks wasn’t a great investment but we had bought them online without seeing them in person and at a decent price. Luckily the bushings were in good shape and we were able to use them when rebuilding the second set of forks. In addition we can still use the cartridge rods along with the upper tubes and other parts for spares so all is not lost.
 Upon assembling the forks the first step is to install the two bushings. One fits in a groove on the end of the upper fork leg and the other slides over the top tube and seats itself in the top of the lower leg below the fork seal.
Next the bottoming cone can be dropped in place and the cartridge rode installed and tightened up.
For the fork seals we bought some new seals from Synergy seals. These do not require a special fork seal driver but instead use a strip of plastic that you insert first and then push the seal in between it and the inner fork leg.
 The reason for the strip is to make sure the new seal doesn’t catch and tear on the lip that holds the spring clip in place.
This part can really be frustrating but after you figure out the first one the second was isn’t as bad. We ended up using an allen key to help seat the seal all the way down before removing the plastic strip.
With the new seals in place we installed the Synergy plastic ring that sits on top of the seal and then the spring clip which prevents the seal from popping out from the pressures inside the forks.
Before installing the dust seal we followed a tip we found online. You remove the spring that fits around the dust seal and pull it apart. Once apart cut off 5mm or so from the female end and then put it back together. Doing this is supposed to help prevent any weeping of oil. If you go with stock type seals you can also do this trick there as well but in our case the Synergy seals don’t use them. Sliding the dust seals in place was easy and we were onto adding oil.
 The WP 50mm forks have a different adjuster on each leg. One side has an adjuster for compression and the other for rebound. For our oil selection we opted to go with Torco and run a heavier 15 weight in the rebound side and 10 weight in the compression side.
Again this is a tip from a contact we found on the internet that swears by these forks. This person has hours and hours of testing different setups on these forks and says that he literally removes the stock forks off his new bikes and sells them, installing his trusty WP 50mm forks instead.
 With our oil in hand we filled each leg with the respective weight oil, making sure the top leg was down, springs were out and that the cartridge rod was down in the fork.
To finalize the oil height at 135mm from the top of we used an old trick to use the nozzle from a spray bottle and mark the tube at the correct height. Then you just insert the spray tube into the fork up to the mark you made and spray away - works great!
With both forks full of oil we installed the springs, spacers and retaining clips and then put the caps back on.
After all this the adjusters still worked and there were no leaks from the seals, mission accomplished.
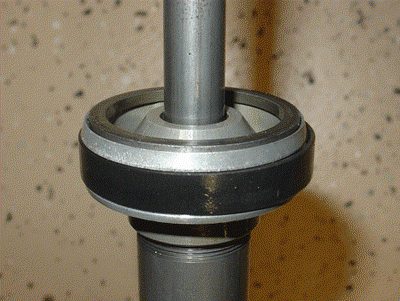
The final item that is said to be a “must have” to bring these forks up into their full potential range is a fork brace. Back when the WP 50mm forks were popular Summers Racing (SRC) used to make a billet fork brace. The idea is that the fork brace connects both fork legs together preventing any twisting action that commonly occurs when going over ruts or rough terrain. By adding a brace you stop the twisting of the conventional forks but you don’t take away the flex in the actual tubes that makes them so compliant off-road, supposedly a great off-road combo.
Searching for a new SRC fork brace we found we were out of luck - they don’t make them anymore. Finding a used one also didn’t yield any results so we had to figure out something if we wanted to get the most from these forks. After some digging we learned that a company called SMG Billet had a made a batch of these braces that were very similar to the original SRC brace and served the same purpose.
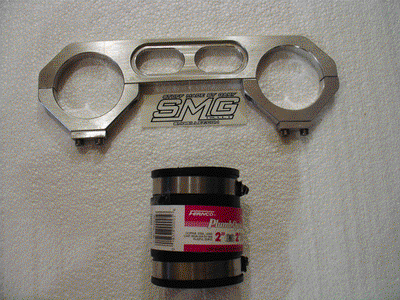 After contacting SMG we spoke with the owner Gary and he confirmed he did in fact have braces in stock. We immediately bought a brace from SMG and had it shipped out. Gary did a great job and the new fork brace looks like a true work of art.
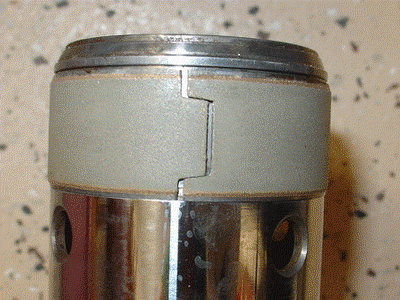
To mount the brace to the forks we also picked up a Fernco 2” plumbing fitting from the hardware store. Basically you just cut each end off and then slide over the forks so the brace mounts to rubber avoiding metal to metal contact.
Once the bike is together we will still need to check the sag on the forks to see what numbers we get. Since we currently have the stock .40kg fork springs we may need to either add some preload spacers to the forks or even go to a stiffer set of springs to get the sag in the ball-park. Our goal is to have a plush off-road fork for rocks and single-track trails but that can still handle the deep desert whoops at speed. Part of the beauty of the 50mm WP forks is that they have huge bottoming cones that resist bottoming, thus allowing plusher settings for the small stuff.
We now have a fresh set of WP 50mm conventional forks and new knowledge of how to rebuild them ourselves.
 Your Privacy Choices